How to Turn an Old Slow Cooker into a Perfect Planter
Transparency Note: We independently select these products based on research and user reviews. If you buy something through our links, we may earn a commission.
Material efficiency is the hallmark of a functional kitchen. A ceramic slow cooker insert is often overlooked as a piece of equipment, but it is an ideal candidate for home infrastructure. It is heavy, non-reactive, and possesses excellent thermal mass, meaning it resists rapid temperature swings. These thermal properties are vital for stabilizing a plant’s root system, which is arguably the most sensitive part of any living organism in your kitchen.
Many standard upcycling guides suggest using these inserts as "cachepots”, hiding a plastic nursery pot inside. While this is simple, it creates a "dead zone" between the two vessels. This space acts as an incubator for trapped moisture, mold, and stagnant air, which can compromise the air quality of your sanctuary. Instead, this protocol builds a permanent extraction system directly into the vessel itself, turning it into a dedicated, high-performance home for your Unkillable Plants.
1. The Extraction Requirement: Drilling Ceramic
If you plant directly into a vessel, drainage is non-negotiable. Without it, the bottom of the pot inevitably becomes an anaerobic environment—a swamp where oxygen cannot reach the roots. This leads to root rot, which is the primary cause of plant death in indoor environments.
The Tooling Protocol
You cannot use standard wood or metal drill bits on glazed ceramic. You require a Diamond-Tipped Masonry Hole Saw Bit (1/2 inch is the standard size for adequate drainage).
The Safety Spec: Do not attempt to use a standard masonry bit (the ones with the "wings" or flutes); they will cause the ceramic to shatter or crack from the impact of the hammer-action. You need a diamond-grit bit, which grinds through the material rather than chipping it.
The Lubrication/Cooling Cycle: Ceramic is brittle and heat-sensitive. As you drill, friction will superheat the bit. If the bit gets too hot, it will melt the bond, and the ceramic will stress-fracture. You must use a constant stream of water to cool the bit. I recommend using a "duct tape dam"—a circle of tape around the drilling site—filled with a small amount of water to keep the bit submerged during the process.
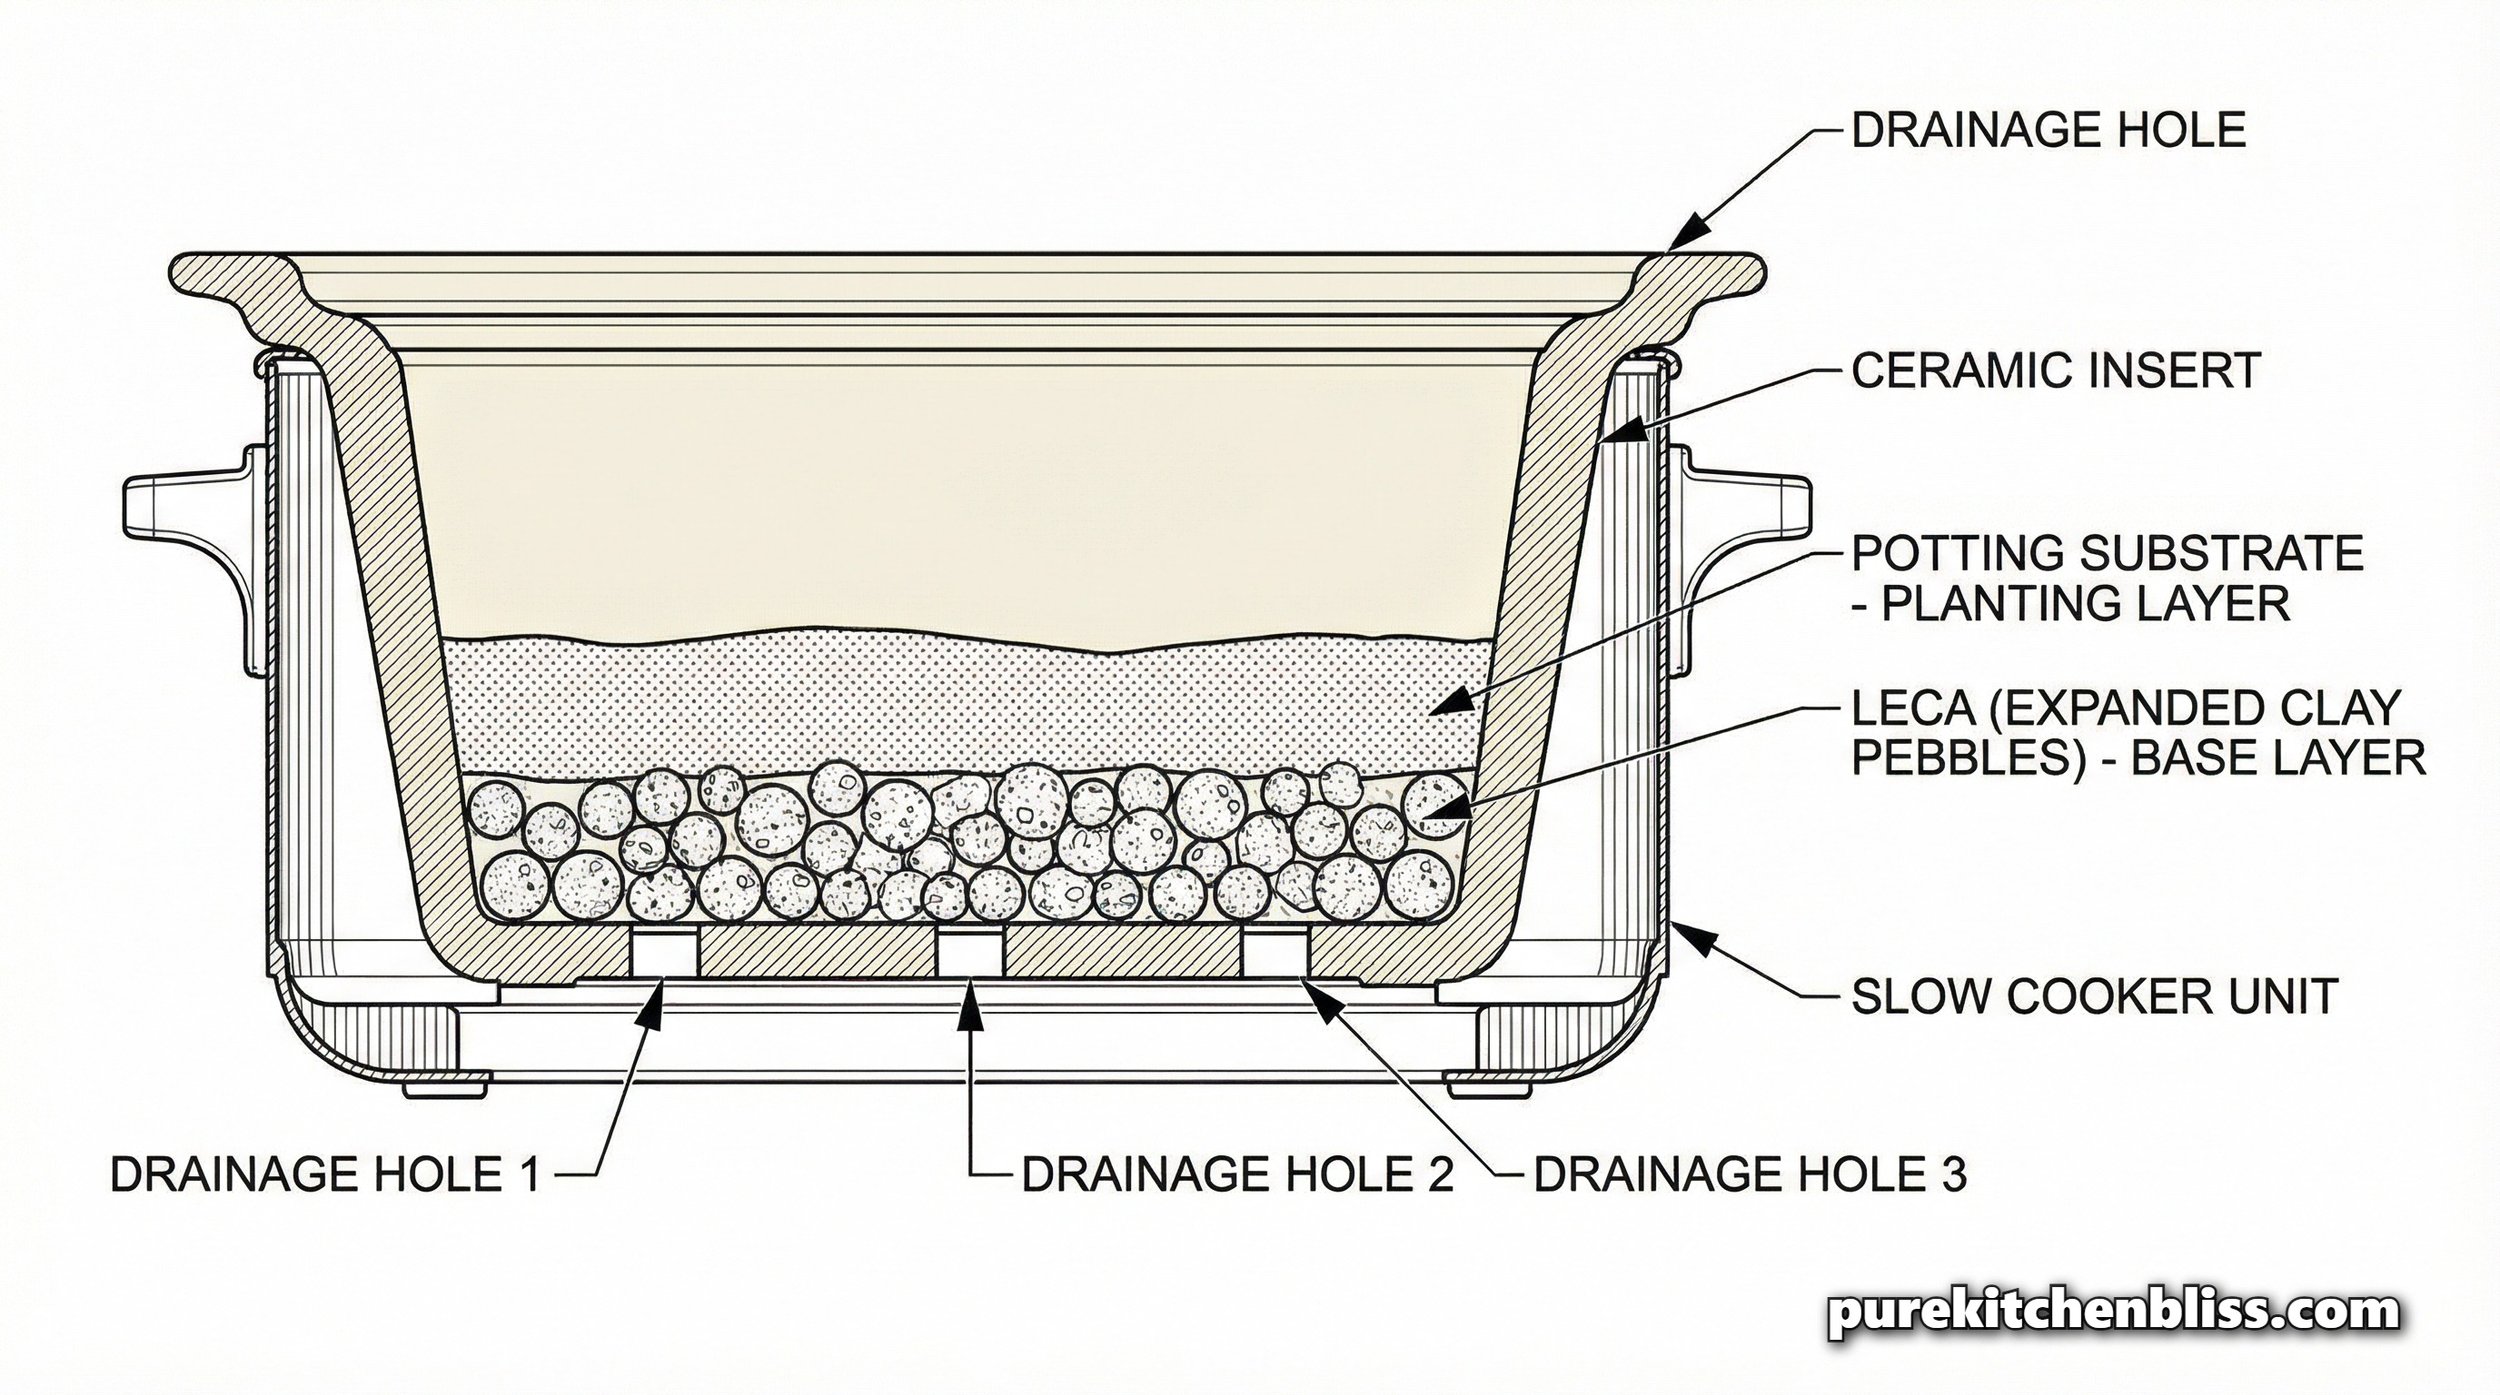
The Infrastructure: Aim for 3 to 4 holes in the base. This redundancy is critical. If one hole becomes clogged with substrate or root growth, the others remain functional, maintaining the aeration of the system.
2. The Foundation Layer: Managing Hydro-Dynamics
Because the slow cooker insert is deep and cylindrical, it can become stagnant if the soil density is too high. You need to manage the "water table" within the pot.
The Substrate Build
The Drainage Layer: Start with a 1-inch layer of expanded clay pebbles (Leca) or coarse inorganic gravel at the bottom. This acts as a "Sumpless Drain," ensuring the soil line is never sitting in standing water.
The Filtration Layer: Place a piece of landscape fabric, a mesh screen, or even a basic paper coffee filter over the pebbles before adding your soil. This prevents "Soil Migration"—the process where smaller soil particles wash down into the drainage layer, eventually clogging your holes and defeating the entire system.
Capillary Action: Once the filter is in place, you are ready for high-quality, well-draining potting medium. This layered approach ensures that moisture exits the pot efficiently while retaining enough hydration for the root system to thrive.
TECHNICAL WARNING: THE MATERIAL STRESS TEST
Before you commit to drilling, perform a "Material Identification" test. Run a magnet over the bottom of your insert. Some "vintage" slow cookers have metal casings or composite bases (a mix of ceramic and polymer/metal). If the base is not pure, solid ceramic, do not attempt to drill it—the materials will delaminate and crack at the drill site. If the base is solid, uniform ceramic, you have a lifetime vessel.
3. Thermal Inertia and Plant Selection
Ceramic has high "Thermal Inertia," meaning it has the ability to store thermal energy. It retains cold and holds heat longer than plastic or thin terracotta.
The Physics of Roots: Most indoor plants are accustomed to stable ground temperatures. Thin plastic pots are subject to rapid heating when sunlight hits them and rapid cooling at night. This is "Thermal Shock."
The Advantage: Ceramic inserts mitigate these swings. They act as a thermal buffer, keeping the root system at a consistent temperature. Plants that prefer stable soil conditions—like Snake Plants, ZZ Plants, or Pothos, thrive in these vessels because they don't experience the stress of a sun-warmed plastic pot.
The Exception: Avoid plants that require rapid drying cycles, like Cacti or certain desert Succulents, unless your environment is very warm. The ceramic walls will hold moisture significantly longer than a standard porous clay pot. If you choose a succulent, you must significantly increase the percentage of perlite in your soil mix to ensure rapid gas exchange and moisture evaporation.
4. Maintenance and Surface Purity
Since you are repurposing a kitchen tool into a living tool, maintenance is required to keep the material functional and aesthetically aligned with your sanctuary.
The Visual Audit: During your Sunday Night Countertop Reset, perform a quick inspection of the outside of the ceramic.
Efflorescence Management: If you see white "salt" buildup on the ceramic (this is efflorescence caused by mineral leaching from the water/fertilizer), do not scrub it with steel wool, which will scratch the glaze. Instead, wipe it with a 50/50 mix of distilled white vinegar and water. This neutralizes the minerals and restores the finish.
The Purity Spec: A clean ceramic surface is not just an aesthetic choice. It is a functional one. A clean surface is less likely to harbor the "Biofilms" that invite pests like Fruit Flies. By maintaining the glaze, you ensure the vessel remains impermeable and resistant to bacterial colonization.
GET THE PLANTER INFRASTRUCTURE
To build this properly, you need the right tools. We’ve sourced the exact diamond-tipped bits and high-performance substrate additives to ensure your build is professional-grade.
Conclusion: Engineering a Second Life
Repurposing is not about clutter; it’s about material efficiency. In a high-output kitchen, we often find ourselves with perfectly functional vessels that have been retired from food service. By drilling proper drainage and layering the substrate correctly, you aren't just "crafting"—you are converting a high-quality ceramic tool into a permanent piece of home infrastructure. It’s cleaner, greener, and ultimately more respectful of the materials. When you treat your plant containers with the same engineering mindset as your plumbing or your ventilation, you create a home that is truly sustainable and built to last.
Explore More in Your Sanctuary:
To clean the exterior of your new planter: 7 Uses for Vinegar in the Kitchen
To organize the area around your new planter: Open Shelving vs. Upper Cabinets
To manage the humidity levels near your plants: Linen vs. Cotton: Which Fiber is Best?