3 Updates for Your 90's Countertops: High-Impact DIYs for 2026!
If you’re living with a kitchen that’s stuck in the 90s, I know exactly what you’re looking at: that classic "speckled" laminate or, even worse, the forest green or dusty rose counters that were everywhere back then. 🤢
Replacing countertops can cost thousands and turn your kitchen sanctuary into a construction zone for weeks. But it’s 2026, and the DIY world has leveled up! You don’t need a sledgehammer to get a modern look. Whether you want a sleek stone finish or a cozy wood vibe, here are 3 ways to "resurface" your 90's counters and bring them into the current era!
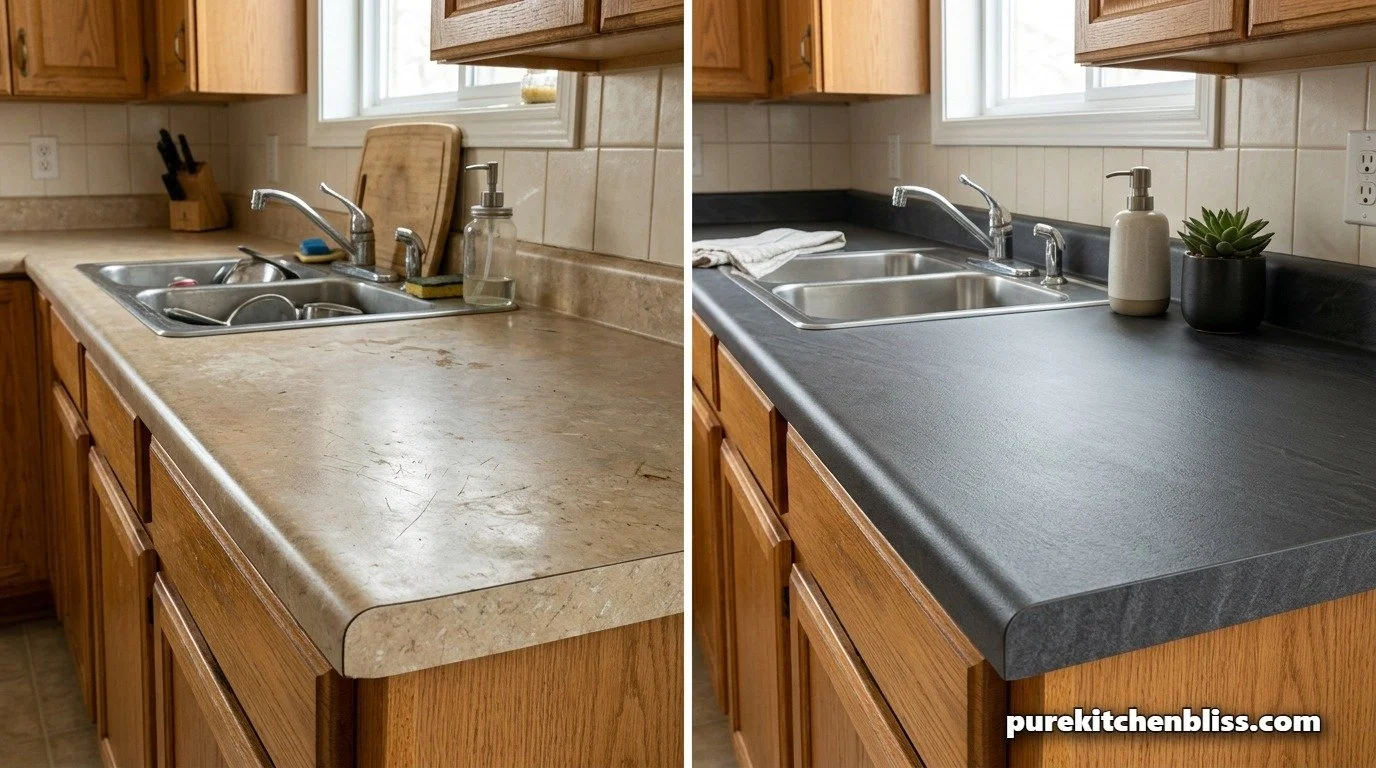
1. The "Stone-Style" Resurfacing Kit 🪨
This is the ultimate move if you want the look of high-end quartz or granite without the price tag.
The Vibe: Kits like Giani or SpreadStone allow you to roll on a real stone finish.
The 2026 Shift: We’re moving away from high-gloss shine and into honed and matte finishes.
The Bestie Tip: Sand your laminate well before you start! The smoother the base, the more "real" the stone finish will look. It’s a total weekend project that changes the whole feel of the room.
2. The "Concrete" Skim Coat 🏗️
If you want that "industrial-meets-organic" look, a concrete skim coat (like Feather Finish) is a game-changer.
The Strategy: You spread thin layers of specialized concrete over your existing laminate.
The Look: It creates a seamless, textured surface that feels incredibly high-end.
The "Dad" Logic: Make sure you seal it with a food-safe, high-quality sealer. It makes the surface almost indestructible—perfect for a house with four kids!
3. Comparison: The DIY Countertop Face-Off
| Method | Difficulty | The Look | Bestie Rating |
|---|---|---|---|
| Stone Kit | Moderate | Quartz/Granite | ⭐⭐⭐⭐⭐ |
| Concrete Skim | High (Labor heavy) | Industrial/Modern | ⭐⭐⭐⭐ |
| Contact Film | Easy | Marble/Wood | ⭐⭐⭐ (Best for renters) |

4. The "Contact Film" Quick-Fix 🎞️
If you’re on a tight budget or living in a rental, heavy-duty adhesive film (like D-C-Fix) is your best friend.
The Hack: It’s basically a giant, high-quality sticker that looks like marble or wood.
The Reality: It’s heat-sensitive, so you have to be careful with hot pans (remember our toaster safety guide!).
The Result: It’s a 2-hour transformation that makes your kitchen look like a million bucks while you save up for a smart fridge.
5. Managing the "Edge" 📐
The dead giveaway of an old 90s counter is the rounded "bullnose" edge.
The Bestie Tip: When you resurface, pay extra attention to the edges and the backsplash lip. Covering these areas seamlessly is what makes a DIY look professional.
The Move: Once your new surface is dry, keep it clean with your organic kit and add some unkillable plants to the corner. When you update the bones of your design, your home finally feels like the sanctuary it’s supposed to be!
Next Up: Love the fresh counters? Let’s organize the clutter that sits on top of them! Check out our Vertical Victory: Why Magnetic Storage is the Secret to Clear Counters!